El tercer control para administrar el layout de nuestra aplicación que veremos es el RelativePanel.
El control RelativePanel nos permite disponer controles visuales (Button, TextBlock, TextBox etc.) en relación a otro control visual (por ejemplo el Button1 a la derecha del objeto TextBox1)
También los podemos disponer a los controles relativo a los bordes del RelativePanel.
Relativo a los bordes del RelativePanel.
Crearemos una interfaz visual con 8 botones ubicados como muestra la imagen utilizando un RelativePanel:
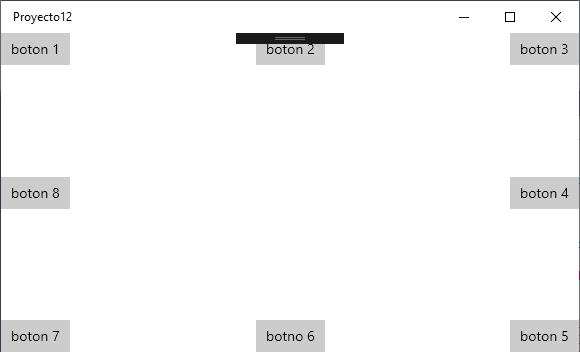
Como primer paso creamos un nuevo proyecto llamado "Proyecto12" seleccionando desde el menú de opciones del Visual Studio: Archivo -> Nuevo -> Proyecto.
El código fuente del archivo MainPage.xaml es:
<Page
    x:Class="Proyecto12.MainPage"
    xmlns="http://schemas.microsoft.com/winfx/2006/xaml/presentation"
    xmlns:x="http://schemas.microsoft.com/winfx/2006/xaml"
    xmlns:local="using:Proyecto12"
    xmlns:d="http://schemas.microsoft.com/expression/blend/2008"
    xmlns:mc="http://schemas.openxmlformats.org/markup-compatibility/2006"
    mc:Ignorable="d"
    Background="{ThemeResource ApplicationPageBackgroundThemeBrush}">

    <RelativePanel>
        <Button x:Name="boton1" Content="boton 1" RelativePanel.AlignLeftWithPanel="True" />
        <Button x:Name="boton2" Content="boton 2" RelativePanel.AlignHorizontalCenterWithPanel="True" />
        <Button x:Name="boton3" Content="boton 3" RelativePanel.AlignRightWithPanel="True" />
        <Button x:Name="boton4" Content="boton 4" RelativePanel.AlignRightWithPanel="True"
            RelativePanel.AlignVerticalCenterWithPanel="True" />
        <Button x:Name="boton5" Content="boton 5" RelativePanel.AlignRightWithPanel="True" RelativePanel.AlignBottomWithPanel="True" />
        <Button x:Name="boton6" Content="botno 6" RelativePanel.AlignBottomWithPanel="True"
            RelativePanel.AlignHorizontalCenterWithPanel="True" />
        <Button x:Name="boton7" Content="boton 7" RelativePanel.AlignBottomWithPanel="True" RelativePanel.AlignLeftWithPanel="True"/>
        <Button x:Name="boton8" Content="boton 8" RelativePanel.AlignLeftWithPanel="True"
            RelativePanel.AlignVerticalCenterWithPanel="True"/>
    </RelativePanel>
</Page>
Como vemos disponemos un RelativePanel y en su interior definimos los objetos contenidos en el mismo:
    <RelativePanel>

    </RelativePanel>
Para ubicarlo en el vértice superior izquierdo al botón cargamos en la propiedad AlignLeftWithPanel del RelativePanel con el valor True:
<Button x:Name="boton1" Content="boton 1" RelativePanel.AlignLeftWithPanel="True" />
Para disponerlo en la parte superior y centrado cargamos en la propiedad AlignHorizontalCenterWithPanel el valor True:
<Button x:Name="boton2" Content="boton 2" RelativePanel.AlignHorizontalCenterWithPanel="True" />
Para disponerlo en la parte superior derecha cargamos en la propiedad AlignRightWithPanel el valor True:
<Button x:Name="boton3" Content="boton 3" RelativePanel.AlignRightWithPanel="True" />
Para disponerlo en la parte derecha a mitad de altura debemos cargar en las propiedades AlignRightWithPanel y AlignVerticalCenterWithPanel el valor True:
        <Button x:Name="boton4" Content="boton 4" RelativePanel.AlignRightWithPanel="True"
            RelativePanel.AlignVerticalCenterWithPanel="True" />
Para disponerlo en la parte inferior derecha debemos cargar en las propiedades AlignRightWithPanel y AlignBottomWithPanel el valor True:
<Button x:Name="boton5" Content="boton 5" RelativePanel.AlignRightWithPanel="True" RelativePanel.AlignBottomWithPanel="True" />
Para disponerlo en la parte inferior centrado debemos cargar en las propiedades AlignBottomWithPanel y AlignHorizontalCenterWithPanel el valor True:
        <Button x:Name="boton6" Content="botno 6" RelativePanel.AlignBottomWithPanel="True"
            RelativePanel.AlignHorizontalCenterWithPanel="True" />
Para disponerlo en la parte inferior izquierda debemos cargar en las propiedades AlignBottomWithPanel y AlignLeftWithPanel el valor True:
<Button x:Name="boton7" Content="boton 7" RelativePanel.AlignBottomWithPanel="True" RelativePanel.AlignLeftWithPanel="True"/>
Para disponerlo en la parte izquierda a mitad de atura debemos cargar en las propiedades AlignLeftWithPanel y AlignVerticalCenterWithPanel el valor True:
        <Button x:Name="boton8" Content="boton 8" RelativePanel.AlignLeftWithPanel="True"
            RelativePanel.AlignVerticalCenterWithPanel="True"/>
Este proyecto lo puede descargar en un zip desde este enlace :Proyecto12.zip
Relativo a otro control.
Crearemos una interfaz visual como muestra la imagen utilizando entre otros controles de layout los RelativePanel:
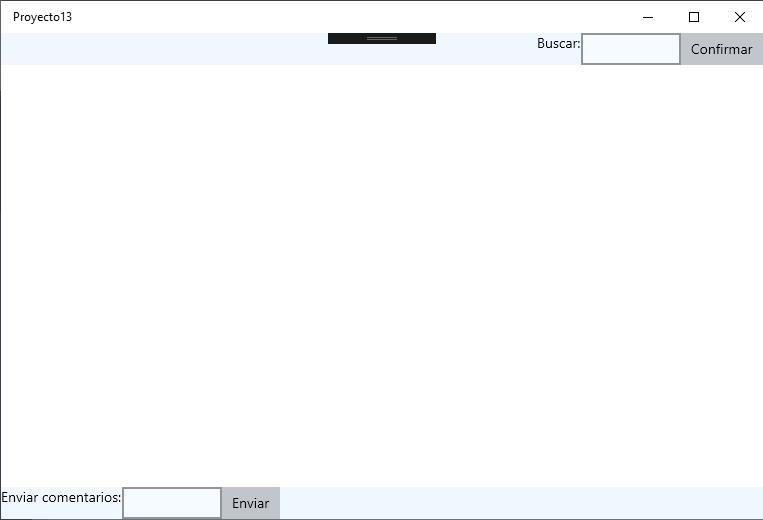
Como podemos ver dispondremos dos RelativePanel, uno en la parte superior y otro en la parte inferior.
Como primer paso creamos un nuevo proyecto llamado "Proyecto13" seleccionando desde el menú de opciones del Visual Studio: Archivo -> Nuevo -> Proyecto.
El código fuente del archivo MainPage.xaml es:
<Page
    x:Class="Proyecto13.MainPage"
    xmlns="http://schemas.microsoft.com/winfx/2006/xaml/presentation"
    xmlns:x="http://schemas.microsoft.com/winfx/2006/xaml"
    xmlns:local="using:Proyecto13"
    xmlns:d="http://schemas.microsoft.com/expression/blend/2008"
    xmlns:mc="http://schemas.openxmlformats.org/markup-compatibility/2006"
    mc:Ignorable="d"
    Background="{ThemeResource ApplicationPageBackgroundThemeBrush}">

    <Grid>
        <Grid.RowDefinitions>
            <RowDefinition Height="auto" />
            <RowDefinition Height="*" />
            <RowDefinition Height="auto" />
        </Grid.RowDefinitions>
        <RelativePanel Grid.Row="0" Background="AliceBlue">
            <Button x:Name="boton1" Content="Confirmar" RelativePanel.AlignRightWithPanel="True"/>
            <TextBox x:Name="textBox1" RelativePanel.LeftOf="boton1" Width="100" />
            <TextBlock x:Name="textBlock1" Text="Buscar:" RelativePanel.LeftOf="textBox1" />
        </RelativePanel>
        <RelativePanel Grid.Row="2" Background="AliceBlue">
            <TextBlock x:Name="textBlock2" Text="Enviar comentarios:" />
            <TextBox x:Name="textBox2" RelativePanel.RightOf="textBlock2" Width="100"/>
            <Button x:Name="boton2" Content="Enviar" RelativePanel.RightOf="textBox2" />
        </RelativePanel>

    </Grid>
</Page>
Definimos un Grid con tres filas donde ubicaremos en la primera y última fila los controles RelativePane:
    <Grid>
        <Grid.RowDefinitions>
            <RowDefinition Height="auto" />
            <RowDefinition Height="*" />
            <RowDefinition Height="auto" />
        </Grid.RowDefinitions>
El primer RelativePanel lo ubicamos en la fila 0 del Grid:
<RelativePanel Grid.Row="0" Background="AliceBlue">
Dentro del RelativePanel disponemos un botón alienado a la derecha del RelativePanel como vimos en el ejemplo anterior:
<Button x:Name="boton1" Content="Confirmar" RelativePanel.AlignRightWithPanel="True"/>
El TextBox lo ubicamos a la izquierda del boton iniciando la propiedad LeftOf:
<TextBox x:Name="textBox1" RelativePanel.LeftOf="boton1" Width="100" />
Finalmente el TextBlock lo ubicamos a la izquierda del TextBox:
<TextBlock x:Name="textBlock1" Text="Buscar:" RelativePanel.LeftOf="textBox1" />
Por otro lado el RelativePanel ubicado al final de la página lo agregamos en la fila 2 del Grid:
<RelativePanel Grid.Row="2" Background="AliceBlue">
Dentro del RelativePanel ubicamos primero un TextBlock:
<TextBlock x:Name="textBlock2" Text="Enviar comentarios:" />
Seguidamente disponemos un TextBox a la defecha del TextBlock:
<TextBox x:Name="textBox2" RelativePanel.RightOf="textBlock2" Width="100"/>
Y por último agregamos un Button a la derecha del TextBox:
<Button x:Name="boton2" Content="Enviar" RelativePanel.RightOf="textBox2" />
Hemos visto dos nuevas propiedades de los RelativePanel llamadas LeftOf y RightOf. Existen otras dos propiedades llamadas Above y Below que disponen los controles arriba o abajo con respecto a otro control.
Este proyecto lo puede descargar en un zip desde este enlace :Proyecto13.zip
Resumen de propiedades.
Propiedades en relación al borde del RelativePanel:
RelativePanel.AlignTopWithPanel
RelativePanel.AlignBottomWithPanel
RelativePanel.AlignLeftWithPanel
RelativePanel.AlignRightWithPanel
RelativePanel.AlignVerticalCenterWithPanel
RelativePanel.AlignHorizontalCenterWithPanel
El verdadero poder de la RelativePanel proviene de la combinación de las propiedades anteriores junto a las propiedades:
Above
Below
LeftOf
RightOf
Finalmente existen otras propiedades que nos permiten alinear los controles contenidos en un ReletivePanel con respecto a otros controles:
AlignLeftWith
AlignRightWith
AlignTopWith
AlignBottomWith
AlignVerticalCenterWith
AlignHorizontalCenterWith
Problema.
Desarrollar el siguiente formulario utilizando un RelativePanel:
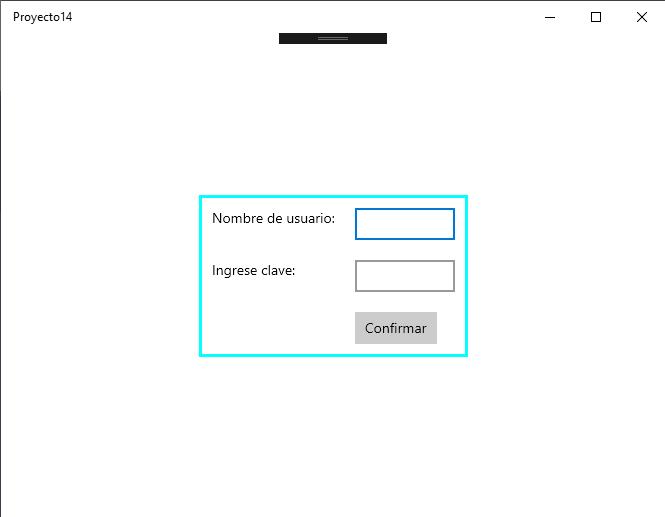
Como primer paso creamos un nuevo proyecto llamado "Proyecto14" seleccionando desde el menú de opciones del Visual Studio: Archivo -> Nuevo -> Proyecto.
El código fuente del archivo MainPage.xaml es:
<Page
    x:Class="Proyecto14.MainPage"
    xmlns="http://schemas.microsoft.com/winfx/2006/xaml/presentation"
    xmlns:x="http://schemas.microsoft.com/winfx/2006/xaml"
    xmlns:local="using:Proyecto14"
    xmlns:d="http://schemas.microsoft.com/expression/blend/2008"
    xmlns:mc="http://schemas.openxmlformats.org/markup-compatibility/2006"
    mc:Ignorable="d"
    Background="{ThemeResource ApplicationPageBackgroundThemeBrush}">

    <RelativePanel BorderThickness="3" BorderBrush="Aqua" HorizontalAlignment="Center" VerticalAlignment="Center">
        <TextBlock x:Name="textBlock1"
                   Text="Nombre de usuario:"
                   Margin="10,10,10,10"/>
        <TextBox x:Name="textBox1"
                 RelativePanel.RightOf="textBlock1"
                 Width="100"
                 Margin="10,10,10,10"/>
        <TextBlock x:Name="textBlock2"
                   Text="Ingrese clave:"
                   RelativePanel.Below="textBlock1"
                   RelativePanel.AlignTopWith="passwordBox1"
                   Margin="10,10,10,10"/>
        <PasswordBox x:Name="passwordBox1"
                     RelativePanel.Below="textBox1"
                     RelativePanel.AlignLeftWith="textBox1"
                     Width="100"
                     Margin="10,10,10,10"/>
        <Button x:Name="boton1"
                Content="Confirmar"
                RelativePanel.Below="passwordBox1"
                RelativePanel.AlignLeftWith="passwordBox1"
                Margin="10,10,10,10"/>
    </RelativePanel>
</Page>
Definimos un RelativePanel con un borde de 3 píxeles de color "Agua" y lo centramos en forma horizontal y vertical:
    <RelativePanel BorderThickness="3" BorderBrush="Aqua" HorizontalAlignment="Center" VerticalAlignment="Center">

    </RelativePanel>
Definimos un TextBlock:
        <TextBlock x:Name="textBlock1"
                   Text="Nombre de usuario:"
                   Margin="10,10,10,10"/>
Luego Definimos un TextBox a la derecha del TextBlock:
        <TextBox x:Name="textBox1"
                 RelativePanel.RightOf="textBlock1"
                 Width="100"
                 Margin="10,10,10,10"/>
ahora definimos otro TextBlock debajo del TextBlock anterior y alineado a la parte superior al contol PasswordBox que se puestra a la derecha:
        <TextBlock x:Name="textBlock2"
                   Text="Ingrese clave:"
                   RelativePanel.Below="textBlock1"
                   RelativePanel.AlignTopWith="passwordBox1"
                   Margin="10,10,10,10"/>
El control PasswordBox se encuentra debajo del TextBox donde se ingresa el nombre y se alinea con respecto a la izquierda de dicho control:
        <PasswordBox x:Name="passwordBox1"
                     RelativePanel.Below="textBox1"
                     RelativePanel.AlignLeftWith="textBox1"
                     Width="100"
                     Margin="10,10,10,10"/>
Finalmente el botón se encuentra debajo del PaswordBox y alineado a la izquierda de este mismo:
        <Button x:Name="boton1"
                Content="Confirmar"
                RelativePanel.Below="passwordBox1"
                RelativePanel.AlignLeftWith="passwordBox1"
                Margin="10,10,10,10"/>
Este proyecto lo puede descargar en un zip desde este enlace :Proyecto14.zip